KDUMP configuration

Normal scenario, Every Linux experts are facing number of server hung cases/issues, we have to know what is the RCA for this. So, need to enable/configure kdump on the server. Let me explain how can we configure kdump in the server.

Kdump captures the real time memory information as a dump file known as vmcore (Virtual Memory Core). A vmcore is a dump of all memory contents on a system at a point in time. kexec is a fastboot mechanism which helps kdump service to generate vmcore.

I would recommend to enable kdump service and test it as mentioned in the below article :

      How to troubleshoot kernel crashes, hangs, or reboots with kdump on Red Hat Enterprise Linux

      https://access.redhat.com/solutions/6038#testing


   Note that, when you test kdump, the server will reboot automatically  and collect a vmcore at the target location


==> We would require a vmcore file at the time of server hung to troubleshoot further on the server hang issue.

   Hence once you configured the kdump as mentioned above, and if the issue happens again, please trigger the sysrq manually and collect the vmcore file. Once you share the vmcore file at the time of issue, we can help you with further investigation. Below articles will help you for the same.

How can sysrq signals be triggered through a DELL DRAC in order to troubleshoot a hung system

   https://access.redhat.com/solutions/453673


   How to use the SysRq facility to collect information from a RHEL server

   https://access.redhat.com/solutions/2023

==============================================

kexec


kexec is a fastboot mechanism that allows booting a Linux kernel from the context of an already running kernel without going through the BIOS. Since BIOS checks at startup can be very time consuming (especially on big servers with numerous peripherals), kexec can save a lot of time for developers who need to reboot a machine often for testing purposes

kdump is a reliable kernel crash-dumping mechanism that utilizes the kexec software. The crash dumps are captured from the context of a freshly booted kernel; not from the context of the crashed kernel. Kdump uses kexec to boot into a second kernel whenever the system crashes. This second kernel, often called a capture kernel, boots with very little memory and captures the dump image.

The first kernel reserves a section of memory that the second kernel uses to boot. Be aware that the memory reserved for the kdump kernel at boot time cannot be used by the standard kernel, which changes the actual minimum memory requirements of Red Hat Enterprise Linux. To compute the actual minimum memory requirements for a system,


Script to Send Email Alert When Memory Gets Low

#!/bin/bash
###############################################################################
#Args :
#Email :Test@gmail.com
#######################################################################################
## declare mail variables
##email subject
subject=”Server Memory Status Alert”
##sending mail as
from=”server.monitor@example.com”
## sending mail to
to=”admin1@example.com”
## send carbon copy to
also_to=”admin2@example.com”
## get total free memory size in megabytes(MB)
free=$(free -mt | grep Total | awk ‘{print $4}’)
## check if free memory is less or equals to 100MB
if [[ “$free” -le 100 ]]; then
## get top processes consuming system memory and save to temporary file
ps -eo pid,ppid,cmd,%mem,%cpu –sort=-%mem | head >/tmp/top_proccesses_consuming_memory.txt
file=/tmp/top_proccesses_consuming_memory.txt
## send email if system memory is running low
echo -e “Warning, server memory is running low!\n\nFree memory: $free MB” | mailx -a “$file” -s “$subject” -r “$from” -c “$to” “$also_to”
fi
exit 0

Install/Setup and configure Chef Server/Workstation/Node on CentOS/RHEL 6.4

What is chef :-

Chef is a powerful configuration management utility that turns infrastructure into code. With the Chef users can easily manage, configure and deploy the resources across the network from the centralized location irrespective of the environment (cloud, on-premises, or hybrid)

It acts as a hub, ensuring that the right cookbooks are used, that the right policies are applied, that all of the node objects are up-to-date, and that all of the nodes that will be maintained are registered and known to the Chef Server. The Chef Server distributes configuration details (such as recipes, templates, and file distributions) to every node within the organization. Chef then does as much of the configuration work as possible on the nodes themselves (and not on the Chef Server).

Components of Chef:

Chef is consist of a Chef server, one or more workstations, and a node where the chef-client is installed. Components name is based on the roles played by each machine in the Chef ecosystem.

Chef Server: This is the central hub server that stores the cookbooks and recipes uploaded from workstations, which is then accessed by chef-client for configuration deployment.

Chef Workstations: This where recipes, cookbooks, and other chef configuration details are created or edited. All these are then pushed to the Chef server from the workstation, where they will be available to deploy to chef-client nodes.

Chef Client: This the target node where the configurations are deployed in which the chef-client is installed. A node can be any machine (physical, virtual, cloud, network device, etc..)

How To Setup a Chef 12 on CentOS 7 / RHEL 7

I) Prerequisite

  1. Host should have fully configured hostname.
  2. Should have DNS entry in place.
  3. Following package are required.

Install and Configure the Chef Server:

  1. Go to http://www.opscode.com/chef/install.
  2. Click the Chef Server tab.
  3. Select the Operating system, Version, and Architecture.
  4. Select the version of Chef Server 11.x to download, and then click the link that appears to download the package.
  5. Install the downloaded package using the correct method for the operating system on which Chef Server 11.x will be installed.
    # rpm -ivh https://opscode-omnibus-packages.s3.amazonaws.com/el/6/x86_64/chef-server-11.0.8-1.el6.x86_64.rpm

6. Configure Chef Server 11.x by running the following command:

# chef-server-ctl reconfigure

Check the status of Chef Server components by using the following command.
chef-server-ctl status

Create an Admin user and Organization:
# chef-server-ctl user-create admin admin admin admin@itzgeek.local password -f /etc/chef/admin.pem
# chef-server-ctl user-create USER_NAME FIRST_NAME LAST_NAME EMAIL 'PASSWORD' -f PATH_FILE_NAME

Chef Workstations:

A workstation is a computer that is configured to the author, test and maintain cookbooks. These cookbooks are then uploaded to Chef server. It is also used to bootstrapping a node that installs the chef-client on nodes.


Download the latest version of Chef Development Kit (0.19.6 at the time of writing).

wget https://packages.chef.io/stable/el/7/chefdk-0.19.6-1.el7.x86_64.rpm

Install ChefDK.

rpm -ivh chefdk-*.rpm

Verify the components of Chef Development Kit.

chef verify

Some of the users may want to set Ruby version default to Ruby version installed with Chef. Check the current Ruby location.

which ruby

This command will yield you a result if your machine has Ruby installed. Run the below command to load CheDK variables to user profile file.

echo 'eval "$(chef shell-init bash)"' >> ~/.bash_profile

Load the user profile.

. ~/.bash_profile

Now, check the Ruby. You should get the similar output.

# which ruby
/opt/chefdk/embedded/bin/ruby

Install git:

Before generating chef-repo, you must install an open source version control tool called git on the machine.

yum -y install git

One the installation is complete. Generate Chef-Repo using “chef generate repo” command.

cd ~
chef generate repo chef-repo

This command places the basic chef repo structure into a directory called “chef-repo” in your home directory.

ls -al ~/chef-repo/

Output:

total 32
drwxr-xr-x. 8 root root 4096 Nov 12 18:30 .
dr-xr-x---. 5 root root 4096 Nov 12 18:29 ..
-rw-r--r--. 1 root root 1133 Nov 12 18:29 chefignore
-rw-r--r--. 1 root root  255 Nov 12 18:29 .chef-repo.txt
drwxr-xr-x. 3 root root   36 Nov 12 18:29 cookbooks
drwxr-xr-x. 3 root root   36 Nov 12 18:29 data_bags
drwxr-xr-x. 2 root root   41 Nov 12 18:29 environments
drwxr-xr-x. 7 root root 4096 Nov 12 18:29 .git
-rw-r--r--. 1 root root  106 Nov 12 18:29 .gitignore
-rw-r--r--. 1 root root   70 Nov 12 18:29 LICENSE
-rw-r--r--. 1 root root 1499 Nov 12 18:29 README.md
drwxr-xr-x. 2 root root   41 Nov 12 18:29 roles

Add version control:

Setup a user with the email address to begin the git configuration. Replace the “green” colored values according to your environment.

git config --global user.name "admin"
git config --global user.email "admin@itzgeek.local"

Go to the chef-repo directory and initialize it.

cd ~/chef-repo/
git init

Now, let’s create a hidden directory called “.chef” under the chef-repo directory. This hidden directory will hold the RSA keys that we created on the Chef server.

mkdir -p ~/chef-repo/.chef

Since this hidden directory stores the RSA keys, it should not be exposed to the public. To do that we will add this directory to “.gitignore” to prevent uploading the contents to GitHub.

echo '.chef' >> ~/chef-repo/.gitignore

Add and commit all existing files.

cd ~/chef-repo/
git add .
git commit -m "initial commit"

Check the status of the directory.

git status

Output:

nothing to commit, working directory clean

Copy the RSA Keys to the Workstation:

The RSA keys (.pem) generated when setting up the Chef Server will now need to be placed on the workstation. Place it under “~/chef-repo/.chef” directory.

scp -pr root@chefserver:/etc/chef/admin.pem ~/chef-repo/.chef/
scp -pr root@chefserver:/etc/chef/itzgeek-validator.pem ~/chef-repo/.chef/

Create knife.rb File:

Knife is a command line interface for between a local chef-repo and the Chef server. To make the knife to work with your chef environment, we need to configure it by creating knife.rb in the “~/chef-repo/.chef/” directory.

Now, create and edit the knife.rb file using your favorite editor.

vi ~/chef-repo/.chef/knife.rb

In this file, paste the following information:

current_dir = File.dirname(__FILE__)
log_level                :info
log_location             STDOUT
node_name                "admin"
client_key               "#{current_dir}/admin.pem"
validation_client_name   "itzgeek-validator"
validation_key           "#{current_dir}/itzgeek-validator.pem"
chef_server_url          "https://chefserver.itzgeek.local/organizations/itzgeek"
syntax_check_cache_path  "#{ENV['HOME']}/.chef/syntaxcache"
cookbook_path            ["#{current_dir}/../cookbooks"]

Adjust the following items to suit for your infrastructure.

node_name: This the username with permission to authenticate to the Chef server. Username should match with the user that we created on the Chef server.

client_key: The location of the file that contains user key that we copied over from the Chef server.

validation_client_name: This should be your organization’s short name followed by -validator.

validation_key: The location of the file that contains validation key that we copied over from the Chef server. This key is used when a chef-client is registered with the Chef server.

chef_server_url: The URL of the Chef server. It should begin with https://, followed by IP address or FQDN of Chef server, organization name at the end just after /organizations/.

{current_dir} represents ~/chef-repo/.chef/ directory, assuming that knife.rb file is in ~/chef-repo/.chef/. So you don’t have to write the fully qualified path.


Testing Knife:

Now, test the configuration by running knife client list command. Make sure you are in ~/chef-repo/ directory.

cd ~/chef-repo/
knife ssl fetch

This command will add the Chef server’s certificate file to trusted certificate directory.

You may get an error like below on your first attempt:

ERROR: SSL Validation failure connecting to host: chefserver.itzgeek.local - SSL_connect returned=1 errno=0 state=error: certificate verify failed
ERROR: Could not establish a secure connection to the server.
Use `knife ssl check` to troubleshoot your SSL configuration.
If your Chef Server uses a self-signed certificate, you can use
`knife ssl fetch` to make knife trust the server's certificates.

Original Exception: OpenSSL::SSL::SSLError: SSL Error connecting to https://chefserver.itzgeek.local/organizations/itzgeek/clients - SSL_connect returned=1 errno=0 state=error: certificate verify failed

To resolve this issue, we need to fetch the Chef server’s SSL certificate on our workstation beforehand running the above command.

knife ssl fetch

This command will add the Chef server’s certificate file to trusted certificate directory.

Once the SSL certificate has been fetched, run the previous command to test the knife configuration.

knife client list

Bootstrapping a New Node with Knife:

Bootstrapping a node is a process of installing chef-client on a target machine so that it can run as a chef-client node and communicate with the chef server.

From the workstation, you can bootstrap the node either by using the node’s root user, or a user with elevated privileges.

# knife bootstrap chefclient.itzgeek.local -x root -P pass --sudo

Important options:

-x: The ssh username

-P: The ssh password

-p: The ssh port

-N: Set your chef-client node name. Leaving this out will usually make hostname being used as the chef-client node name.

–sudo: If the user name on the node will need to use sudo to perform administrative actions, then use this flag. Note: It will prompt you for sudo the sudo password.

Since I didn’t use -N in the command, the hostname will become chef node name.

Output:

Doing old-style registration with the validation key at /root/chef-repo/.chef/itzgeek-validator.pem...
Delete your validation key in order to use your user credentials instead

Connecting to chefclient.itzgeek.local
chefclient.itzgeek.local -----> Installing Chef Omnibus (-v 12)
chefclient.itzgeek.local downloading https://omnitruck-direct.chef.io/chef/install.sh
chefclient.itzgeek.local   to file /tmp/install.sh.2626/install.sh
chefclient.itzgeek.local trying curl...
chefclient.itzgeek.local el 7 x86_64
chefclient.itzgeek.local Getting information for chef stable 12 for el...
.     .     .     .     .     .chefclient.itzgeek.local [2016-11-12T19:24:36-05:00] WARN: Node chefclient.itzgeek.local has an empty run list.
chefclient.itzgeek.local Converging 0 resources
chefclient.itzgeek.local
chefclient.itzgeek.local Running handlers:
chefclient.itzgeek.local Running handlers complete
chefclient.itzgeek.local Chef Client finished, 0/0 resources updated in 05 seconds

Once the bootstrapping is complete, list down the nodes using the following command.

knife node list

Output:

chefclient.itzgeek.local

Get the client node details.

knife client show chefclient.itzgeek.local

Output:

admin:     false
chef_type: client
name:      chefclient.itzgeek.local
validator: false

That’s All for now. We will soon meet again with another post on creating chef cookbooks.


Reference : http://www.itzgeek.com/how-tos/linux/centos-how-tos/setup-chef-12-centos-7-rhel-7.html/3

https://sachinsharm.wordpress.com/2013/10/11/installsetup-and-configure-chef-serverworkstationnode-on-centosrhel-6-4/


Linux Interview Tips

  1. Linux Boot Process
  2. Linux Partition
  3. Linux File System Hierarchy
  4. Important Configuration files Linux
  5. /Proc
  6. Server configuration file s and Packages
  7. Monitoring Commands
  8. Port Numbers In Linux

9.Linux Logs

Linux Boot Process (Startup Sequence)

linux-boot-process

Linux Partition for OS installation

/

/boot

Swap

/home

/var

/etc

Linux Directory Structure/ File System

filesystem-structure

Linux Server and Port number

20 – FTP Data (For transferring FTP data)

21 – FTP Control (For starting FTP connection)

22 – SSH(For secure remote administration which uses SSL to encrypt the transmission)

23 – Telnet (For insecure remote administration

25 – SMTP(Mail Transfer Agent for e-mail server such as SEND mail)

53 – DNS(Special service which uses both TCP and UDP)

68 – DHCP

69 – TFTP(Trivial file transfer protocol uses udp protocol for connection less transmission of data)

80 – HTTP/WWW (apache)

88 – Kerberos

110 – POP3(Mail delivery Agent)

123 – NTP(Network time protocol used for time syncing uses UDP protocol)

137 – NetBIOS(nmbd)

139 – SMB-Samba(smbd)

143 – IMAP

995 – POP3s

161 – SNMP(For network monitoring)

389 – LDAP(For centralized administration)

443 – HTTPS(HTTP+SSL for secure web access)

636 – ldaps(both tcp and udp)

873 – rsync

989 – FTPS-data

990 – FTPS

993 – IMAPS

2049 – NFS(nfsd, rpc.nfsd, rpc, portmap) 2401 – CVS server

3306 – MySql


1. /proc Directories with names as numbers

Do a ls -l /proc, and you’ll see lot of directories with just numbers. These numbers represents the process ids, the files inside this numbered directory corresponds to the process with that particular PID.

Following are the important files located under each numbered directory (for each process):

  • cmdline – command line of the command.
  • environ – environment variables.
  • fd – Contains the file descriptors which is linked to the appropriate files.
  • limits – Contains the information about the specific limits to the process.
  • mounts – mount related information

Following are the important links under each numbered directory (for each process):

  • cwd – Link to current working directory of the process.
  • exe – Link to executable of the process.
  • root – Link to the root directory of the process.

2. /proc Files about the system information

Following are some files which are available under /proc, that contains system information such as cpuinfo, meminfo, loadavg.

/proc/cpuinfo – information about CPU,

  • /proc/meminfo – information about memory,
  • /proc/loadvg – load average,
  • /proc/partitions – partition related information,
  • /proc/version – linux version

Some Linux commands read the information from this /proc files and displays it. For example, free command, reads the memory information from /proc/meminfo file, formats it, and displays it.

To learn more about the individual /proc files, do “man 5 FILENAME”.

  • /proc/cmdline – Kernel command line
  • /proc/cpuinfo – Information about the processors.
  • /proc/devices – List of device drivers configured into the currently running kernel.
  • /proc/dma – Shows which DMA channels are being used at the moment.
  • /proc/fb – Frame Buffer devices.
  • /proc/filesystems – File systems supported by the kernel.
  • /proc/interrupts – Number of interrupts per IRQ on architecture.
  • /proc/iomem – This file shows the current map of the system’s memory for its various devices
  • /proc/ioports – provides a list of currently registered port regions used for input or output communication with a device
  • /proc/loadavg – Contains load average of the system
    The first three columns measure CPU utilization of the last 1, 5, and 10 minute periods.
    The fourth column shows the number of currently running processes and the total number of processes.
    The last column displays the last process ID used.
  • /proc/locks – Displays the files currently locked by the kernel
    Sample line:
    1: POSIX ADVISORY WRITE 14375 08:03:114727 0 EOF
  • /proc/meminfo – Current utilization of primary memory on the system
  • /proc/misc – This file lists miscellaneous drivers registered on the miscellaneous major device, which is number 10
  • /proc/modules – Displays a list of all modules that have been loaded by the system
  • /proc/mounts – This file provides a quick list of all mounts in use by the system
  • /proc/partitions – Very detailed information on the various partitions currently available to the system
  • /proc/pci – Full listing of every PCI device on your system
  • /proc/stat – Keeps track of a variety of different statistics about the system since it was last restarted
  • /proc/swap – Measures swap space and its utilization
  • /proc/uptime – Contains information about uptime of the system
  • /proc/version – Version of the Linux kernel, gcc, name of the Linux flavor installed.

Linux Log Files

  1. /var/log/messages – Contains global system messages, including the messages that are logged during system startup. There are several things that are logged in /var/log/messages including mail, cron, daemon, kern, auth, etc.
  1. /var/log/dmesg – Contains kernel ring buffer information. When the system boots up, it prints number of messages on the screen that displays information about the hardware devices that the kernel detects during boot process. These messages are available in kernel ring buffer and whenever the new message comes the old message gets overwritten. You can also view the content of this file using the dmesg command.
  1. /var/log/auth.log – Contains system authorization information, including user logins and authentication machinsm that were used.
  1. /var/log/boot.log – Contains information that are logged when the system boots
  1. /var/log/daemon.log – Contains information logged by the various background daemons that runs on the system
  1. /var/log/dpkg.log – Contains information that are logged when a package is installed or removed using dpkg command
  2. /var/log/kern.log – Contains information logged by the kernel. Helpful for you to troubleshoot a custom-built kernel.
  1. /var/log/lastlog – Displays the recent login information for all the users. This is not an ascii file. You should use lastlog command to view the content of this file.
  1. /var/log/maillog /var/log/mail.log – Contains the log information from the mail server that is running on the system. For example, sendmail logs information about all the sent items to this file
  1. /var/log/user.log – Contains information about all user level logs
  1. /var/log/Xorg.x.log – Log messages from the X
  1. /var/log/alternatives.log – Information by the update-alternatives are logged into this log file. On Ubuntu, update-alternatives maintains symbolic links determining default commands.
  1. /var/log/btmp – This file contains information about failed login attemps. Use the last command to view the btmp file. For example, “last -f /var/log/btmp | more”
  1. /var/log/cups – All printer and printing related log messages


  1. /var/log/anaconda.log – When you install Linux, all installation related messages are stored in this log file


  1. /var/log/yum.log – Contains information that are logged when a package is installed using yum
  1. /var/log/cron – Whenever cron daemon (or anacron) starts a cron job, it logs the information about the cron job in this file
  1. /var/log/secure – Contains information related to authentication and authorization privileges. For example, sshd logs all the messages here, including unsuccessful login

/var/log/wtmp or /var/log/utmp – Contains login records. Using wtmp you can find out who is logged into the system. who command uses this file to display the information.

  1. /var/log/faillog – Contains user failed login attemps. Use faillog command to display the content of this file.

Apart from the above log files, /var/log directory may also contain the following sub-directories depending on the application that is running on your system.

  • /var/log/httpd/ (or) /var/log/apache2 – Contains the apache web server access_log and error_log
  • /var/log/lighttpd/ – Contains light HTTPD access_log and error_log
  • /var/log/conman/ – Log files for ConMan client. conman connects remote consoles that are managed by conmand daemon.
  • /var/log/mail/ – This subdirectory contains additional logs from your mail server. For example, sendmail stores the collected mail statistics in /var/log/mail/statistics file
  • /var/log/prelink/ – prelink program modifies shared libraries and linked binaries to speed up the startup process. /var/log/prelink/prelink.log contains the information about the .so file that was modified by the prelink.
  • /var/log/audit/ – Contains logs information stored by the Linux audit daemon (auditd).
  • /var/log/setroubleshoot/ – SELinux uses setroubleshootd (SE Trouble Shoot Daemon) to notify about issues in the security context of files, and logs those information in this log file.
  • /var/log/samba/ – Contains log information stored by samba, which is used to connect Windows to Linux.
  • /var/log/sa/ – Contains the daily sar files that are collected by the sysstat package.
  • /var/log/sssd/ – Use by system security services daemon that manage access to remote directories and authentication mechanisms.

Check H/W information

#!/bin/bash
H=`hostname`
cpu=`nproc`
GB=1024
echo -e “—————————————————————————————————————————-”
echo -e “\t Hardware Resource and Model”
echo -e “—————————————————————————————————————————-”
echo -e “CPU Resources Allocated = $cpu core”
M=`dmidecode -t 17 | grep -w MB | awk ‘{ SUM += $2} END { print SUM }’`
res=$(echo “scale=3;$M/$GB” | bc)
echo -e “Memory Resoruces Allocated = $res GB”
P=`dmidecode -t processor | grep -i intel | grep -i version | head -1 | cut -d’:’ -f2`
echo -e “Processor Model = $P”
TH=`fdisk -l | grep -i sd | grep -i gb |wc -l`
echo -e “Total Number Disk connected = $TH”
TSH=`fdisk -l | grep -i sd | grep -i gb | awk ‘{ SUM += $3} END { print SUM }’`
dkres=$(echo “scale=3;$TSH/$GB” |bc)
echo -e “Total Size of all Disk = $dkres TB”
NN=`lspci | grep -i ethernet | cut -d ‘:’ -f3 | head -1`
echo -e “Network Interface card Model = $NN”
TN=`lspci | grep -i ethernet | wc -l`
echo -e “Total Number of NIC Connected = $TN”
NS=`ethtool eth0 | grep -i speed |awk ‘{print $2,$3}’`
echo -e “Network Interface Speed = $NS”
echo -e “—————————————————————————————————————————-”

CentOS-7

  CentOS-7 is now powered by version 3.10.0 of the Linux kernel, with advanced support for Linux Containers and XFS (is a high-performance 64-bit journaling file system) as the default file system. It’s also the first version of CentOS to include the systemd management engine, the firewalld dynamic firewall system, and the GRUB2 boot loader. CentOS 7 supports 64 bit x86 machines. MySQL has been switched with MariaDB.

Systemd

————

  • Systemd is a system and service manager for Linux Operating system.
  • Systemd uses the command ‘systemctl‘ to manage service instead of service,chkconfig, runlevel and power management commands in the CentOS 6.x
  • Systemd is designed to be backwards compatible with SysV init script (using in centos 6.x)
  • In Centos & systemd replaces Upstart as the default init system

rpm -qa | grep systemd

Systemd units

  • Represented by unit configuration files in /etc/systemd/system
  • Encapsulate information about system service, listening sockets,saved system state snapshots.

Systemd file locations:

Directory   Description

/usr/lib/systemd/system/         Systemd file distributed with installed RPM package

/run/systemd/system/    Systemd unit file created at run time.

/etc/systemd/system/    Systemd unit file created and managed by the system administrator

How to use Systemctl?

#systemctl stop vsftpd.service

#systemctl stop vsftpd
1) Listing services

#systemctl list-units –type service

#systemctl list-unit-files –type service

2) Displaying service status:

#systemctl  status httpd.service

#systemctl is-active httpd.service

#systemctl is-enable httpd.service

3) Starting a service

#systemctl start mysqld.service

4) Stopping a service

#systemctl  stop named.service


5) Restarting a service

#systemctl restart vsftpd.service

#systemctl try-restart named.service

#systemctl reload httpd.service


6) Enabling a service

#systemctl enable mysqld.service

#systemctl reenable httpd.service


7) Disabling a service

#systemctl disable vsftpd.service

8) Preventing service from being started manually or by another service

#systemctl mask vsftpd.service

#systemctl unmask vsftpd.service

Working with Systemd Targets

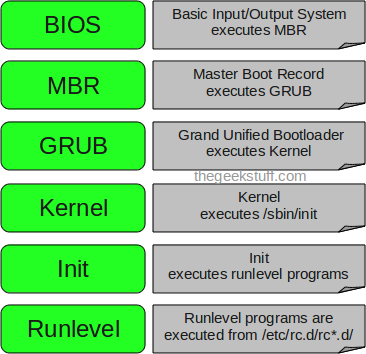
* Runlevels were numbered from 0 to 6 and were defined by a selection of system services to be run.

* In CentOS 7, the concept runlevels has been replaced with systemd targets.


FIREWALLD SUITE

The dynamic firewall daemon firewalld provides a dynamically managed firewall with support for network “zones” to assign a level of trust to a network and its associated connections and interfaces. It has support for IPv4 and IPv6 firewall settings. A graphical configuration tool, firewall-config, is used to configure firewalld,

The new suite in centos 7 will replace iptables in the future the concept of chain and rules are withdrawn and the concept of zone is introduced. Each interfaced is linked to the zone whose property can be interchanged or varied either graphically or using the command firewalld-cmd.

It is dynamic thus not full restart required after a config file edit.


  • The concept of chain is removed and the concept of zones are introduced.
  • Each interface is linked to a zone. An interface can have only one zone linked to it. But a zone can have more than one interface linked to it.
  • There are many predefined zone round which an interface can be placed which are drop, block, public, dmz, work, home, internal and trusted.
  • Zone can be configured with the set of units describing the behaviour of the zone.


The essential differences between firewalld and the iptables service are:

The iptables service stores configuration in /etc/sysconfig/iptables, while firewalld stores it in various XML files in /usr/lib/firewalld/ and /etc/firewalld/.


With the iptables service, every single change means flushing all the old rules and reading all the new rules from /etc/sysconfig/iptables while with firewalld there is no re-creating of all the rules; only the differences are applied. Consequently, firewalld can change the settings during runtime without existing connections being lost.


Understanding Network Zones

Firewalls can be used to separate networks into different zones based on the level of trust the user has decided to place on the devices and traffic within that network. NetworkManager informs firewalld to which zone an interface belongs. An interface’s assigned zone can be changed by NetworkManager or via the firewall-config tool which can open the relevant NetworkManager window for you.


The zone settings in /etc/firewalld/


drop

Any incoming network packets are dropped, there is no reply. Only outgoing network connections are possible.


block

Any incoming network connections are rejected with an icmp-host-prohibited message for IPv4 and icmp6-adm-prohibited for IPv6. Only network connections initiated from within the system are possible.


public

For use in public areas. You do not trust the other computers on the network to not harm your computer. Only selected incoming connections are accepted.

external

trusted

All network connections are accepted.

internal

For use on internal networks. You mostly trust the other computers on the networks to not harm your computer. Only selected incoming connections are accepted.

home

For use in home areas. You mostly trust the other computers on networks to not harm your computer. Only selected incoming connections are accepted.

internal

For use on internal networks. You mostly trust the other computers on the networks to not harm your computer. Only selected incoming connections are accepted.


trusted

All network connections are accepted.


It is possible to designate one of these zones to be the default zone. When interface connections are added to NetworkManager, they are assigned to the default zone. On installation, the default zone in firewalld is set to be the public zone.

Configuring the Firewall Using the Command Line Tool, firewall-cmd


  • firewall-cmd –version
  • firewall-cmd –help


  • firewall-cmd –state >. displays state of firewallld
  • firewall-cmd –reload >> reload firewalld
  • firewall-cmd –get-zones >> shows all zones available
  • firewall-cmd –get-services >>  shows all service supported
  • firewall-cmd –get-icmptypes >> shows all the ICMP types supported
  • firewall-cmd –list-all-zones >. list sone with features
  • firewall-cmd [–zone=<zone>] –list-all >> list feauters of a single zone
  • firewall-cmd –get-default-zone >. show the default zone
  • firewall-cmd –set-default-zone=<zone> >> set the default zone
  • firewall-cmd –get-active-zones >> show zones which are active or bind to interface
  • firewall-cmd –get-zone-of-interface=<interface> >> shows zone of interface
  • firewall-cmd [–zone=<zone>] –add-interface=<interface> >> adding to zone (default )
  • firewall-cmd [–zone=<zone>] –change-interface=<interface> >> changing zones
  • firewall-cmd [–zone=<zone>] –remove-interface=<interface> >> remove from zone
  • firewall-cmd [–zone=<zone>] –query-interface=<interface> >> check interface in zone
  • firewall-cmd [ –zone=<zone> ] –list-services >. shows available service in zone
  • firewall-cmd –panic-on/off >> enable/disable panic mode (block)


Disabling firewalld

#systemctl disable firewalld

#systemctl stop firewalld

Start firewalld

#systemctl start firewalld

Locatectl Command

The system locale is set in the file /etc/locale.conf but the setting are limited to the sort order, display language, time format etc. Other important setting include the keyboard layout for consoles and the GUI if the X Server is running. The command localectl can display and control many of these setting.


#localectl status  >> to display locale settings
#localectl set-locale LANG=en_GB.utf8  >> to set the Language
#localectl list-locales >> to lists locales
#locale list-keymaps >> list keyboard mappings
#locale set-keymap uk  >> sets the key map

Timedatectl Command

In CentOS7, A new command used to set date and time is “timedatectl“. this command is distributed as part of the systemd system and service manager. you can use this command to change the date and time, set the time zone, check the current date and time or others

To find list of all available time zones,

#timedatectl list-timezones

To set timezone

#timedatectl set-timezone time_zone

In this example, set timezone to America/Chicago

#timedatectl set-timezone America/Chicago


#timedatectl set-time YYYY-MM-DD >> To set date

timedatectl  set-time 2014-07-19


#timedatectl set-time HH:MM:SS >> To set time

timedatectl  set-time 15:12:00

#timedatectl set-ntp yes >> enable ntp server

Hostnamectl command

We can change host name by modifying the /etc/sysconfig/network in centos and other linux systems, but it did not take an effect of the modification. Even after multiple reboot of server.

The procedure to change the host name in CentOS 7 is now totally different from the previous versions.

In CentOS/RHEL 7, there is a command line utility called hostnamectl, which allows you to view or modify hostname related configurations.

CentOS 7 supports three class of Host Names:


Static –  The static host name is traditional host which can be chosen by the user and is stored in /etc/hostname file or is the normal hostname set with hostname command usually FQDN


Transient –  The “transient” hostname is a temporary hostname assigned at run time, for example, by a DHCP or mDNS server


Pretty –  hostname is allowed to have a free-form (including special/whitespace characters) hostname, presented to end users


#hostnamectl status


To view static, transient or pretty hostname only, use “–static”, “–transient” or “–pretty” option, respectively

#hostnamectl status [–static|–transient|–pretty]


To change all three hostnames: static, transient, and pretty, simultaneously:

#hostnamectl set-hostname <host-name>


Used to set hostname remotely(-H option using )

#hostnamectl set-hostname -H username@hostname

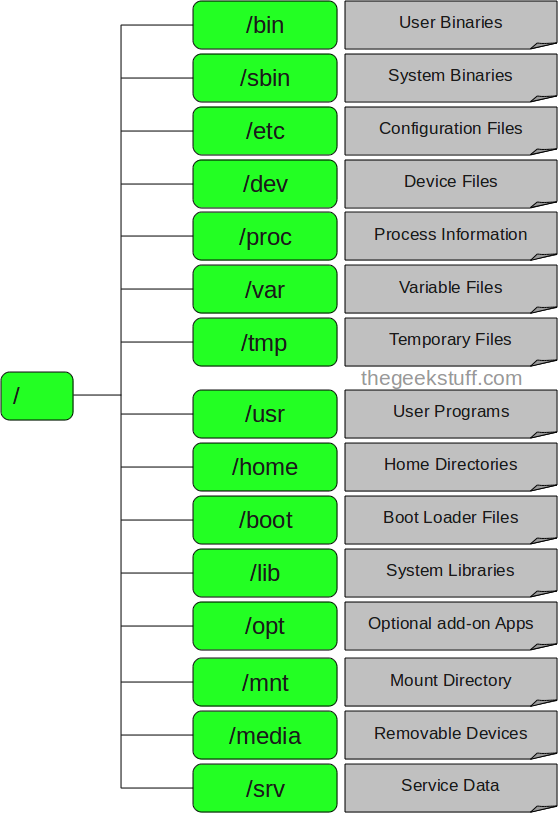
Root file system change


* The /bin, /sbin, /lib and /lib64 directories are now under the /usr directory.

* The /tmp directory can now be used as a temporary file storage system (tmpfs).

* The /run directory is now used as a temporary file storage system (tmpfs). Applications can now use /run the same way they use the /var/run directory.

/tmp and /run directory

  • Offers the ability to use /tmp as a mount point for a temporary file storage system (tmpfs).
  • When enabled, this temporary storage appears as a mounted file system, but stores its content in volatile memory instead of on a persistent storage device. No files in /tmp are stored on the hard drive except when memory is low, in which case swap space is used. This means that the contents of /tmp are not persisted across a reboot.

to enable and disable this service

# systemctl enable/disable tmp.mount

  • Files stored in /run and /run/lock are no longer persistent and do not survive a reboot.


httpd package

  • ⁠Configuration file contain less configuration compared to previous version of the htpd, it is hard copied to manuals installed in /usr/share/httpd.
  • Uses a single binary and provides these Multi-Processing Models as loadable modules: worker, prefork (default), and event. Edit the /etc/httpd/conf.modules.d/00-mpm.conf file to select which module is loaded.
  • Content previously installed in /var/cache/mod_proxy has moved to /var/cache/httpd under either the proxy or the ssl subdirectory.
  • Content previously installed in /var/www has moved to /usr/share/httpd including icons, error and and noindex(new)
  • Module for the previous versions not supported
  • Configuration files that load modules are now placed in the /etc/httpd/conf.modules.d directory. Packages that provide additional loadable modules for httpd (like the php package) are added to this  directory. Any configuration files in the conf.modules.d directory are processed before the main body of httpd.conf. Configuration files in the /etc/httpd/conf.d directory are now processed after the main body of httpd.conf.
  • /etc/httpd/conf.d/autoindex.conf configures mod_autoindex directory indexing
  • /etc/httpd/conf.d/userdir.conf configures access to us


New Packages


Chrony

Provided as an alternative for ntpd package. Its not well compatible with the features of ntps, for such reason ntpd package persist but it is deprecated.


#yum install -y chrony

The Chrony configuration is in the /etc/chrony.conf file.

Start the service

# chkconfig chronyd on
# service chronyd start

HAProxy

It comes as a in house load balancer for http connections. The package assigns the load to the workers in a manner described and returns the result the inquirer. Thus act as a proxy which listen to a specific port. The manner usually round robin or other can be specified in the configuration file including the workers and the check list. Against which the worker is tested for the stability and removed it if check fails.

Kernal Patch

kaptach and other utils are introduced to provide dynamic kernel module editing

https://fedoraproject.org/wiki/FirewallD

https://access.redhat.com/documentation/en-US/Red_Hat_Enterprise_Linux/7/html/Security_Guide/sec-Using_Firewalls.html

Symlink attack in cPanel server

Compromised Symlink Removal

What are symlinks?

In computing, a symbolic link (also symlink or soft link) is a special type of file that contains a reference to another file or directory in the form of an absolute or relative path and that affects pathname resolution.

What is Symlink Race Condition Vulnerability?

If you enable both of the configuration settings SymLinksIfOwnerMatch and FollowSymLinks, Apache will be vulnerable to a race condition through symlinks. This symlink vulnerability allows a malicious user to serve files from anywhere on a server that has not been protected by strict OS-level permissions, A security Vulnerability!

We need to enable both configuration because certain web applications require it, which subject our servers to this vulnerability. At such, we have a script that runs on every Sunday, that will pipe out a list of symlinks and we are required to remove them if it is to root (/) Directory.

Script to find symlink hack:
find /home/*/public_html -type l > /root/symlink.txt
cat symlink | cut -d “public” -f1 | sort | uniq -c | sort -n

Example:

/home/mvtheark/public_html/media/sym/root —> /

How do I clear it off?

Always be very careful when you are clearing off Symlinks! This is because, a wrong move, may either remove the contents of another account, or you may remove the whole root.

Based on the above example, you would want to run the following command to remove the symlink properly.

cd /home/mvtheark/public_html/media/sym/
rm -f * (the quicker method)

rm -f root
rm -f .htaccess
cd ..
* the directory sym has to be empty in order to remove.

rmdir sym/
Note that when you remove the symlink to root, i.e rm -f root, there are no -r operator (non recursive), and no trailing slash behind it.

This is because if you do have it, be prepared to have a shock of a lifetime for yourself, and for your colleagues because you will either remove the contents of another account, or you will remove the whole root, depending on where the symlink leads you to.

Once the above have been completed, you will have deemed to be completed the symlink removal. No other actions should be necessary with regards to the removal of symlinks.

Go a head and secure the server. Ensure you have covered the following.

-Install Modsecurity in the server.
-Ensure current PHP handler is set to Suphp.
-Conduct a scan to find all symlink files in /home with the command and verify them ==> find /home/*/public_html -type l
-Conduct a Rootkit scan and check any binary change has been taken place or not.
-Check with client and if he don’t need symlink server wide, go a head and disable symlink in Apache config (SymLinksIfOwnerMatch) else disable it in the infected account.
-Check if any account is enabled with Shell access, if yes, cross check with client and disable the same.
-Harden PHP to have a per user open_basedir (WHM >PHP open_basedir Tweak)

How does DNS server work

What is DNS?

Short for Domain Name System (or Service or Server), an Internet service that translates domain names into IP addresses. Because domain names are alphabetic, they’re easier to remember. The Internet however, is really based on IP addresses. Every time you use a domain name, therefore, a DNS service must translate the name into the corresponding IP address. For example, the domain name www.example.com might translate to 198.105.232.4.

How DNS works??

Step1: When types www.example.com in the browser

Step2: the operating system looks at /etc/host file,first for the ip address of www.example.com(this can be changed from /etc/nsswitch), then looks /etc/resolv.conf for the DNS server IP for that machine (computer looks is its local DNS cache, which stores information that your computer has recently retrieved).

Step3: If the information is not stored locally, your computer queries (contacts) your ISP’s recursive DNS server. The dns server will search its database for the name www.example.com, if it finds it will give that back, if not it will query the root server(.) for the information.

Step4: root server will return a referral to the .com TLD name server(these TLD name servers knows the address of name servers of all SLD’s).In our case we searched for www.example.com so root server will give us referral to .com TLD servers.

If it was www.example.net then root server will give, .net TLD servers refferal.

Step5: Now One of the TLD servers of .com will give us the referral to the DNS server resposible for example.com domain.

Step6: the dns server for example.com domain will now give the client the ip address of www host(www is the host name.)

eg : dig +trace google.com >> can see the dns tracing.

Generic Top Level Domains(gTLD’s) are TLD’s like .com,.net,.org,.edu etc.

Country Code Top Level Domains are domains such as .in,.us,.uk etc.

{for more details :: http://www.slashroot.in/how-dns-works}


Remove the code injection from a file

Remove the code injection from a file

If the code injection is on first line:
==============
grep -nre “?php” * | cut -d ‘:’ -f1 | sort | uniq -c
grep -nre “?php” * | cut -d ‘:’ -f1 | sort
grep -nre “?php” * | cut -d ‘:’ -f1 | sort | uniq
grep -nre “?php” * | cut -d ‘:’ -f1 | sort | uniq > test.txt
==============
or
grep -nr -e ‘<?php /*versio:3.02*/ ‘ -e ‘(aabeaayx(597,3304));};?><?php’ * | cut -d’:’ -f1,2
or
grep -nr -e ‘<?php /*versio:3.02*/ ‘ -e ‘(aabeaayx(597,3304));};?><?php’ * | cut -d’:’ -f1,2 > test.txt

eg :

[root@ranjith new]# grep -nre “<?php” * | cut -d : -f1,2
file.php:1
file.php:14
—-

Here the injected code is on first line, so just remove after insert the <?php on the first line using sed command.

cat test1.txt | xargs sed -i ‘1d’  delete first line
cat test1.txt | xargs sed -i ‘1i<?php’ add to first line

========================================

SSH key and passphrase creation

Accessing servers from your linux machine.
In your llinux machine, first,  open the terminal and create public key using ssh-keygen command, we can specify the passphrase or leave it.
Your public key has been saved in /root/.ssh/id_rsa.pub file
Copy the key and paste to destination server, /root/.ssh/authorized_keys file (In dest-server in sshd configuration file uncomment “AuthorizedKeysFile”)